Sunday, June 30, 2019

3 Easy Steps to Keep Prayer a Priority


moms who pray

As a Christian homemaker my relationship with Christ is of the utmost importance. Without God, there is no way I could live one moment, much less accomplish all that is required of me each day.  Life is full of triumphs and victories, but with each joyous occasion comes hardships and trials that will challenge our faith to its very core. I find great comfort in knowing there is a greater being who will never disappoint or let me down. Learning how to pray with J.O.Y. has allowed me to grow closer to the Lord, further enabling me to be the wife and mother God has called me to be.

The art of biblical homemaking can only come from a solid relationship with the Lord. The next step is to cultivate an active prayer life. Prayer is a wonderful way to insure the pathways to Christ are kept active and viable. Prayers to our Heavenly Father should be said consistently and on a daily basis. We can read in scripture, many times, where Jesus and other godly men and women prayed with diligence and commitment. Prayer should notbe a last resort, but a constant extension of our worship unto God.


Pray without ceasing. 1 Thessalonians 5:17 (KJV)


Prayer does not have to be a complicated process. It should simply be a gentle, yet focused conversation with the Lord. I have an easy acronym that I like to use to help with planning my prayer time which helps me to keep it a priority. I have heard several prayer acronyms over the years, but the one I like the best is ‘praying with J.O.Y’. Praying in a specific order assures us that we bring honor and glory to God first, the needs of others next, and ourselves last. The letters for the prayer guide I use stand for Jesus, Others, and Yourself.


3 Easy Steps to Keep Prayer a Priority


  • Jesus: If it were not for Jesus dying on the cross we would notbe able to send our prayers to God. We should always send our praises of thanksgiving to Him. During my prayer time, I graciously send my appreciation heavenward for the many blessings He has bestowed upon me, recognizing many of them specifically. We are sinful creatures who owe Jesus a debt of gratitude from saving us from eternal damnation, the least we can do is thank Him for all His provisions.


"Who is he that condemneth? It is Christ that died, yea rather, that is risen again, who is even at the right hand of God, who also maketh intercession for us." Romans 8:34 (KJV)


  • Others: We should put others before ourselves. There are many needs in our world; salvation, healing, strength, courage and protection to name a few. The hurts of this fallen world are great and everyonecould use a prayer spoken on their behalf. It is an honor and privilege to pray for believers and unbelievers alike. It is a very special and intimate way we can serve family, friends, as well as those we don’t even know. Fortunately, God does know each and every one of us and He has called us to bring allour cares unto Him.


"Confess your faults one to another, and pray one for another, that ye may be healed. The effectual fervent prayer of a righteous man availeth much." James 5:16 (KJV)


  • Yourself: Finally, we can and shouldpray for ourselves. The first words spoken in regards to my personal needs is for repentance from sins that often plague me, I pray that God would lead and direct my day, and that I would be in-tune to the opportunities He provides for me each day to serve Him. In regards to my homemaking pursuits; my prayer is that I would accomplish all that He would have me to do each day, as well as to accept the things I cannot.


"Be careful for nothing; but in every thing by prayer and supplication with thanksgiving let your requests be made known unto God." Philippians 4:6 (KJV)


Do not forget to take the time to listen during your prayer time. For it is in those still, quiet moments that we may hear the powerful and mighty words of our Savior. God is real and desires an interactive personal relationship with His believers. If we are doing all the talking with no listening, we may miss His precious words of wisdom and love.


"Be still, and know that I am God: I will be exalted among the heathen, I will be exalted in the earth." Psalms 46:10 (KJV)


The body of Christ needs more prayer warriors, those who will be faithful to lift up the needs of our fallen world to theAuthor andCreator.  As a homemaker my load is often heavy. Weariness can easily grip my countenance, but I hold fast to the comforting words of my Lord, and I cast all my cares upon Him. I can't imagine my life without prayer and communication with God. Keeping prayer a priority in my life gives me strength and courage to press on towards the goal God has set before me. If you are seeking to find joy andsuccess in the art of homemaking, I highly encourage you to commit to consistently praying with J.O.Y.


"Take my yoke upon you, and learn of me; for I am meek and lowly in heart: and ye shall find rest unto your souls.For my yoke is easy, and my burden is light." Matthew 11:29-30 (KJV)


With Love & Hope,
Jennifer

Saturday, June 29, 2019

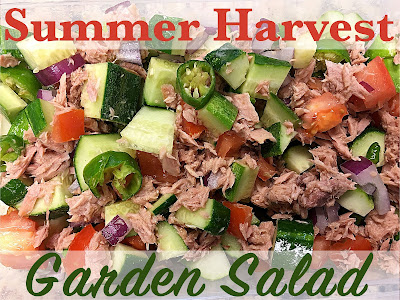
Easy Summer Harvest Salad

Summer Garden Salad

When the summer garden gets to the point that you're swimming in all that wonderful delicious produce; finding ways to use it all up all can start to get complicated! I'm constantly trying to come up with new, and most importantly, simple ways to use the produce the Good Lord gives us. One of my favorite simple summer harvest meals is to make a Summer Harvest Garden Salad.

A typical 'garden salad' is made with lettuce, but to me this is a summer garden salad. In the summer there are no greens available, so that means I improvise with other veggies. The majority of the ingredients in this yummy salad is made with fresh ingredients picked from our garden. While the rest are easily found at your local grocer. It's a super affordable salad chockfull of wholesome ingredients that taste good and are good for you.

Summer Harvest Garden Salad

Ingredients 
(All of the ingredient amounts can be adjusedt to preference or what is available and how much you want to serve)
  1. Diced cucumbers
  2. Finely chopped tomatoes (I'm not a fan of chunks of tomatoes, lol)
  3. Chopped bell pepper
  4. Chopped onion
  5. Chopped hot peppers (optional, but everything we eat has a little kick 😆)
  6. Canned tuna, drained
  7. Favorite salad dressing
Directions 
Combine all ingredients except dressing and chill in fridge. Top with dressing when ready to eat. I like to top mine with homemade Italian dressing.

Yes, it's a super simple recipe, but I know I personally enjoy searching out new recipes to make our meals come together more efficiently. So while it may not be fancy and complicated it is yummy and an awesome way to use up some of that produce you've worked so hard to grow and harvest. But, should you not be overflowing with a summer garden harvest, making this with store-bought ingredients works just as well!

With Love & Hope,
Jennifer

Friday, June 28, 2019

Dehydrating Dill Without a Dehydrator

growing dill

Growing herbs is another wonderful addition to any homestead. While I would love to grow a whole host of different herbs I really only grow a couple different kinds and even then it's only when I really need them. My time is extremely limited and I have to make sure I'm using it wisely, which is why I don't grow more of a variety of herbs.

One of my favorite herbs to grow is dill. It is super easy to plant, pick, and preserve. Talk about my kind of herb. Seriously y'all, this aromatic savory herb is black thumb proof! It's so easy to get carried away and plant more than you'll need. This year we only planted two little rows of dill and if you scroll the pictures, you can see how much we harvested ~ quite a bit for such a small patch.

growing dill
Excuse the crude picture, but this is our storage room/sewing room and it was hard to get a decent picture, but I wanted y'all to see how I hung the bunches. I used push pins to hold them up there.

When it comes to harvesting dill to dehydrate, I simply cut the stems at the base, bunch them into about 1.5 inch diameter bunches (no exact science here, just bunch some stems together), tie yarn or twine around the bunch, knotting tightly and leaving a long tail. Alright here's where we might part ways, lol. Now, I take my bunches of dill and hang them from the ceiling in one of my rooms.

Ok, ok, ok, I know some of ya'll are rolling your eyes and maybe even already left the page; but hear me out. When homesteading everything from your land to the four walls you call your home is fair game to meeting the needs of the homestead. For us, one of those needs includes using our ceiling to hang herbs to dry. It only takes about 2 weeks for them to dry and we do try to use a room that isn't frequented by guest. But honestly, at this point in the game it really wouldn't bother me if folks saw my dill hanging from the ceiling anyways. It would probably be a great conversation starter, lol.

growing dill

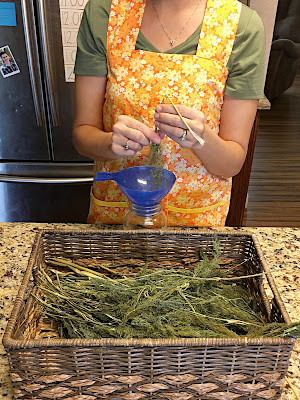
After about two weeks your dill should be dry enough to take off the stems and store in jars. To do this, I take each stem, turn it upside down and strip the dried dill off into a jar.

growing dill

I don't worry about sealing my jars or even using those little preserving packets. I've never had a problem with my dill going bad by just keeping them in glass canning jars in a cool dark place. It's that simple, no need to break out the dehydrator to dehydrate dill. And let me tell y'all fresh dehydrated dill makes the best ranch dressing and dip!!

So, what's your favorite herb to grow?

With Love & Hope,
Jennifer

Thursday, June 27, 2019

Homesteading with Boys: The Low Tech Life

the low tech life
I am a boy mom seven times over. Life is aways loud and rambunctious. It's not always easy being one of the minority genders in our home, especially when the testosterone is running high. Even with all that, I wouldn't change it for the world.

Homesteading with boys is the perfect life if you ask me. It's the best and perfect way to prepare them to be real men. My boys love to be outside. Mind you we only have one acre of land, but they always seem to find all sorts of creative ways to spend their time outside ~ and for that I'm grateful.

Give my boys some tools and some scrap building materials and you never know what you're going to get. Recently, my 12 and 10 year old boys spent several days building a "shop". They received zero help for any adult besides their 18 year old brother helping to cut some metal. To say I was impressed by the finished product, is putting it mildly!

Their little shop could easily pass as a crude cabin from days gone by! When I think of all the lifeskill AND academic lessons they had to use for their special building project, I'm convinced they're going to be just fine when it comes to securing jobs in the future. There's so much more to an education than sitting at a desk staring at a textbook. Sometimes the best teacher is just trial and error and figuring things out for yourselves. But, the opportunity must be available, children have to be given the time, resources, and confidence to experiment with what they can actually do.

Our current society seems to be convinced that modern tech is the way to go. Well, sorry y'all I'm just not convinced. And, it's in moments like these, when my children use their minds and hands to create something so awesome, that I know our alternative lifestyle is perfect for us. Our kids have limited access to technology. I'm not 100% anti technology, but I am very pro keeping devices in the background of our daily lives. Our children do have allowed time for tv gaming and family tv watching it's just not a regular facet of our day.

Our children do not have cell phones (yeah, not even my 16 year old and he manages a successful business), they don't have tablets, or computers. We do have computers and tablets, but they don't belong to our children and they are strictly used in a supervised environment for the purpose of education or research. For our family, technology is a tool used to help us grow in knowledge not a means of pleasure time. For us there's just so many better ways the children can spend their time. One of them is for them to get outside and get creative.

Do I ever hear "I'm bored!" "There's nothing to do!" Um, yeah, plenty of times, but that's when I encourage my children to keep searching for something to do or I put them to work (trust me there's endless work that needs to be done around this homestead!) That usually sparks their creativity bone and they run off to do something on their own or with a sibling, lol.

I realize this way of thinking and raising children isn't the norm, and I'm ok with that. We aren't living our days to keep up with the world, we're here to follow the calling God has in our lives; and for us, living a simple life and teaching our children to use their minds and their hands is simply part of that lifestyle choice. I'm not here to convince you this is the only way to live. My goal is to encourage parents to put technology on the back burner for a bit, and allow their children to use their God-given creative spirit. You might just be a little surprised at what your children can do. 😊

With Love & Hope,
Jennifer

the low tech life

This is a picture of my 'shop building crew' working 
in the pouring down rain to get their shop finished. 

Wednesday, June 26, 2019

Blueberry Picking with the Family


Well, the season for blueberry picking is upon us. Today, me plus eight of my crew went out to see if we could fill a 5 gallon bucket. We were only able to get about a gallon, but we also only had an hour because we had to get back to the house to can some bread and butter pickles and dill pickles. The good thing is when you've got private access to blueberry bushes you can get up early and head to the bushes to pick anytime; so we'll be doing that in the mornings for an hour or so until we've cleaned out the berry bushes.

The berries are nice and plump this year!


Little miss Lydia was picking blueberries like she'd been doing it for years. 


Titus picked a few but mostly he ran around chasing Samuel, lol.


Once Lydia had her fill of picking blueberries we put her in the stroller and Matthew pushed her around. He picked a few berries, but mostly just ate them. Seven is a tough age to balance picking and eating, lol.


Two of my main pickers. Tabitha & Joshua filling their bucket like there was no tomorrow!


Even our big teens get involved in the pickin'. Elijah is a great help and rarely complains about the work around the homestead.


Lucas found himself a good spot to hang out and pick, he was quite ambitious with his own 5 gallon bucket. 😁


And mama of course picking berries. I managed to pick a quarter of a bucket of berries, despite spending an exorbitant amount of time child training a certain 4 year old. {{sigh}}


These three escaped the blueberry 'patch' to find themselves some apples on the apple trees 
(more likely the unripe ones that fell on the ground ~ they'll learn eventually 😅).

We have a good many blueberry bushes on our own property, but these bushes we were picking from are located on our neighbor's property. Over the years we've reached out to people in our area asking if they had fruit producing trees and bushes that we could 'pick on halves'. Picking on halves means several different things but usually it means we pick them some of the fruit in return to pick and keep the rest. This especially works great with those 'senior saints' who planted those wonderful trees and bushes oh so many years ago but aren't able to pick from them any more. We've also enjoyed connecting and building relationship as well as gleaning great wisdom from many of these folks who let us 'pick on halves'. Plus it's an awesome way to fill your larder for nothing but sweat equity. 

My blueberry pickin' crew. 

The pursuit of a simple life has led our family to really think outside the box and get out of our comfort zones. Picking on halves, bartering, simply asking to borrow land and/or tools and equipment; you name it, there's a lengthly list of all the ways we've utilized to simplify our lives and build our homestead. I'm a firm believer that it's a simple life/homesteading frame of mind. All the land and money in the world won't get you back to basics, slowing down and appreciating the blessings you've been given. It's working hard and often doing without that often sparks the greatest ideas and the best inventions. 

So, while it may seem like we're just doing a family fun outing ~ picking blueberries ~ it's really so much more. It's instilling in my children a strong work ethic, it's building relationships, it's teaching them to know where food comes from and how God allows it to grow, it's real life, most importantly it's our life. Yes, it's a little different than most, but it's a great life and one I wouldn't change it for anything.

With Love & Hope,
Jennifer

Tuesday, June 25, 2019

Preserving Corn the Easy Way

preserving corn on the cob

There's modern, FDA approved methods for preserving food and then there's old school, tried and true methods. Now, I do agree that it is best to use safe handling procedures when dealing with food,  but most of the time modern techniques are just overkill and time wasters. I do NOT have time to be doing extra work just to be doing it. This is going to be a super short and sweet post with a simple, no fuss one step guide to preserving corn on the cob.

When I first started preserving food I was totally clueless! I mean, seriously, 20 years ago my culinary skills began with spaghetti and ended with hotdogs. Fast forward, and there isn't much I can't cook or preserve, all thanks to some old timers who took the time to show me the ways of those who came before us. Preserving food used to be just what people did, especially women. Unfortunately, now days, many folks can barely prepare a decent meal (hey, no judgement from me, I used to be one of them!).

As a homesteader and a pursuer of the simple life it just comes natural to learn to cook, grow, and preserve as many different kinds of food items as possible. Corn on the cob was one of the first foods I learned to preserve. Why? Because it was so easy and in the south, it's fairly easy to grow corn. We do skin the kernels off the cob to can and freeze, but that's another lesson for another day. Today is all about having corn on the cob in the off season.

Are y'all ready for it? Well here ya go.....once the corn is shucked and silked, simply put the cobs in freezer baggies and put them in the freezer! Yep, it's that simple. You do NOT have to blanche the cobs!!! I've had folks say you must do this for a myriad of reasons and well it just isn't true. I've tried both ways and they taste the same, one just requires more work. You can also store them in vacuum seal bags if you're concerned about freezer burn; but honestly I've never had problems with the corn crystalizing.

When I'm ready to cook the frozen corn on the cob; I just throw them (frozen) in a pot of water and boil or our favorite way: in the Instant Pot. Using the Instant Pot to make corn on the cob is super simple too and makes the corn taste just as good as if it were picked fresh and eaten right away. I'll share that how-to another day, soon. But in the meantime, you can quickly and easily preserve your bounty of corn by throwing those bad boys in the freezer since it's so super easy, right?

With Love & Hope,
Jennifer

Monday, June 24, 2019

Summer Homeschool Schedule

homeschool schedule
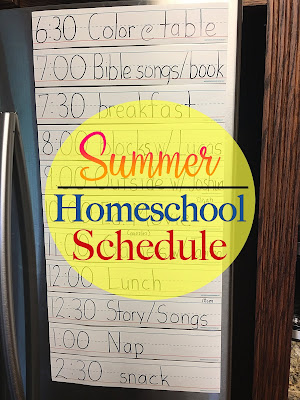
Summer is finally here! And the chaos begins or rather intensifies; its always pure chaos at my house these days regardless of the season, lol. To help keep the crazy to a minimum I like to implement a summer homeschool schedule.

We still homeschool year round but summer is much more relaxed and I like to allow for each of the children to have a little more free time in the summer. Plus, any schedule I implement must be majorly flexible to accommodate the summer garden. Even though I call this our summer "schedule" it's more like a routine, an order of events to give some form of structure, accountability, and stability to our summer days; especially for my sensory processing disorder kiddos.

During the fall, winter, and spring I break up our days into 30 minute slots; in the summer I'm using mostly 1 hour slots. This broader time range gives the bigger kids time to really get involved in projects they may want to accomplish each day.

I always buddy my children up with siblings. This gives them an opportunity to become close friends without snubbing other siblings. One of our goals in raising our children is to instill in them healthy lifelong relationships with their siblings. Plus learning to interact with different people and their unique personalities is a key lifeskill important for adulthood. And lets face it, all of our children have their very own individual personalities, and some children just natural gravitate towards certain people. We want to make sure all the children are equally invested in each other's lives.

Our Summer Homeschool Schedule

6:30 Everyone at the kitchen table. 
Big kids are doing reading and journaling while the little ones are coloring.

7:00 Little ones switch from coloring to listening to bible songs and reading books from a book basket that I change out weekly. Big kids are cleaning their rooms and getting ready for the day.

7:30 We eat breakfast as a family. 

8:00 Little kids play blocks with sibling. 
Big kids free time if all 'house assignments' (our family word for chores) are completed.

9:00 Little kids play outside with sibling.
Big kids continued free time.

10:00 Little kids educational movie supervised by sibling. 
Big kids free time.

11:00 Little kids play games and/or puzzles with sibling.
Big kids free time.

12:00 Lunch together as a family.

12:30 Little kids story time/song time with mom.
Big kids free time.

1:00 Little kids nap time or quite time on blankets in the living room.
Big kids free time.

2:30 Snack time 
(Daddy home)

Once my husband gets home the children typically go off to work the homestead with him.

As you can see this summer schedule is mostly reflective of managing the little people in our family. In our house if the littles (currently anyone 7 and under) are not under 100% constant supervision they are getting into trouble. (sigh) Keeping them occupied allows me to be devoted to my day-to-day tasks which in the summer is mostly spent preserving the garden harvest. I also do one-on-one school lessons with some of the children, as well as a focused efforts on tackling neglected projects.

My older children spend their days: helping around the homestead, reading, playing outside (mostly!!!), creating lego cities, as well as a plethora of other constructive activities. My second and third oldest children manage a property maintenance and lawn care business during the summer which keeps them fairly busy. Our children do not have any tech gear, so their days are not spent on any device. We do allow for some minor T.V. gaming on the weekend evenings and for family T.V. watching (but that's a topic for another day).

Summer is my favorite season. I'm extremely cold natured and having the summer warmth surround me is like an extra-special hug from the good Lord. It is my intentions to enjoy the summer and keeping a scheduled routine helps make our days more enjoyable. When everyone, especially my little people, know what and where they're supposed to be, life runs so much better.

So, do y'all create summer routines and schedules? What are your best mama tips and tricks to make summer low stress and fun for everyone?

With Love & Hope,
Jennifer

Sunday, June 23, 2019

Taming the Laundry Beast


Now that summer is officially here, it's the perfect time to tackle some tasks that may have been pushed to the side during the hustle and bustle of the school year. Yes, summer can be just as busy as the rest of the year, but to me, it seems to have a more mellow feel to it. While spring cleaning is awesome, I like to take summer as an opportunity to get caught up on additional household projects that I have been neglecting. I know that laundry can be a major pain to stay on top of for any size household, but I've got some tips and tricks to help y'all get it under control!

A household of eleven can generate a ton of laundry! If I don't stay on top of things, the laundry monster can rear it's ugly head and make life mighty difficult. No one likes to have massive amounts of laundry to wash, fold, and put away; which is why I made a commitment a long time ago to keep our family's "laundry beast" tamed! Dirty clothes are just a part of life. There's no sense in complaining about it. It's just something that has to be done. I have found creating a laundry plan and sticking to it, makes keeping everyone in clean clothes a breeze.

Now I know many families, especially large families, assign laundry duty to children; and even require older children to do their own laundry. That just won't work in our household for many reasons. The main ones include: we don't have the space for mountains of laundry waiting for a teen to wash, I only wash FULL loads of laundry and none of my children (or adults) have that many clothes to fill a full load, and when littles 'help' fold clothes by themselves they are hardly folded and typically misplaced; which creates more work for me when I have to hunt for peoples clothing. With all that said I do believe children should learn to do laundry which is why I have daily laundry helpers, who can be closely supervised by me.

My personal laundry plan is super easy and effective. I think all mommies across the board, whether you stay at home or work, will find that this system can easily fit into your busy lifestyle.
  1. Designate a location for 3-4 laundry bins. Divide the bins into 'colors', 'lights', 'work', and 'linens'. I typically combine our colors and lights and just sort as I do the wash, therefore only needing 3 bins.
  2. Teach all family members to bring dirty clothes to the bin and sort accordingly. This is probably the hardest part of my laundry system. But, I literally teach this system from the time my kids can walk, they bring their dirty clothes to the bins. Just an aside here: There is dire consequences in our family if dirty laundry is not brought to the appropriate bins. My crew has about 4 complete outfits a piece, if they forget after too many days they will be hurting for some clean clothes, and this mama has very little sympathy, especially since I graciously do all the laundry.
  3. Do a walk through of the house on your way to start the first load of laundry each morning, especially the bathrooms, to collect any stray dirty laundry.
  4. Begin your laundry washing at the start of each day. If there is a bin full, throw it in the wash. Move it to the dryer, and start the next load if there is one. Repeat until all the laundry bins are empty. I don't typically do a load of laundry unless it is a full load; which isn't usually hard to come by with our large crew, lol.
  5. I save the folding for all at once, usually towards the end of the day. After the laundry is folded it is past out to those who can put it away while the remaining I put away. THE LAUNDRY IS NOT DONE UNLESS IT IS PUT AWAY!
With this system I usually end up with two days of no laundry, YEAH! And, on the days I do laundry it's rarely more than three loads, typically just two loads.  I know some folks prefer to do all their laundry on one day; this just doesn't work for me because 1. I don't want to spend HOURS folding and putting away laundry on just one day, I'd rather do a little each day. AND 2. We simply don't have that many clothes to wait until one day a week to wash our dirty clothes.

Taming the laundry beast is super easy when you have a plan and stick to it. 'Dirty clothes' doesn't have to be a 'dirty word', lol. Just look at it like you would brushing your teeth or eating; you wouldn't skip doing either of those each day. What you purpose to do daily becomes a habit and second nature. After a while it simply becomes an automatic system which makes your life easier and creates peace within your household. Start today with a laundry plan and no longer stress about keeping your family in clean clothes.

With Love & Hope,
Jennifer

Saturday, June 22, 2019

Honey Whole Wheat Zucchini Bread


Well, now that everyone's gardens are bumping, there's the question: what to do with all that zucchini. There's really only so much you can do with it, but there are a few ways we make use of the tasty veggie.

My absolute favorite way to eat zucchini is sliced and sautéed in olive oil in a skillet on the stove. I seriously can eat it that way every.single.day, all year ~ too bad we haven't figured out how to grow zucchini year round.  😊 We also grill it, roast it, add it diced to soups and casseroles, and add it shredded to all sorts of baked goods. Today I'm sharing our favorite healthy twist to zucchini bread.

We've been grinding our own wheat for a long time, so it was just natural for me to create a zucchini bread recipe that took advantage of our healthy fresh ground wheat. I think it comes out of the oven just as moist as any refined flour version, maybe even better because there's an added nuttiness that comes from fresh ground wheat. I have made this recipe with regular store-bought whole wheat and it's just as good.

While we aren't a family who has completed omitted refined sugar from our diet, we do try to limit our intake. Which is why this zucchini bread recipe is made with honey. We are blessed with a local source for honey. We typically buy the 'seconds' which has some condensation in the honey. We've never had a problem with the honey so it just makes sense for us to purchase the discounted 5 gallon bucket. A 5 gallon bucket of local raw honey usually lasts us one year and we pay around $125 for the bucket.


Honey Whole Wheat Zucchini Bread

Ingredients:
2 cups of whole wheat flour
1 tsp baking soda
1/2 tsp salt
1 tsp cinnamon
2 cups shredded zucchini
2 eggs
1/2 cup honey
1/4 cup olive oil

Directions:
Mix wet ingredients with zucchini, then add dry ingredients; stirring just until evenly incorporated. Divide into greased loaf pans ( I use regular bread size and mini loaf pans ~ which is perfect for portion control and gift giving). *Side note: I coat my bread pans with coconut oil and then dust them with whole wheat flour. Bake 50-60 minutes @ 300 degrees. I bake my mini loaves for 40 minutes. Remove bread from pan and let cool on cooling racks.


My recipe for Honey Whole Wheat Zucchini Bread is super easy to make, taste great and freezes well. It's an awesome way to fill the freezer with a healthy snack for a later time. If y'all haven't caught on yet, I'm all about making life easier and more convenient if at all possible. Cooking once for multiple meals or snacks definitely makes my life easier. And knowing my family is eating healthy treats makes it all the better. I hope y'all enjoy this recipe and can use up some of your wonderful bounty of zucchini!

With Love & Hope,
Jennifer

Friday, June 21, 2019

Kids in the Kitchen: Memories Not Messes

As mothers we want to make every moment we have with our children count. We often hear the old adage "Quality over Quantity"; which certainly seems applicable when raising children. Our attention is pulled in every direction. The demands of motherhood are extreme and nonstop. A mom is expected to be everywhere and do everything with a smile on her face, all the while never tiring. Well, we all know that just simply isn't going to be the case ALL the time. And so we find ourselves on a 'mommy mission' to find those little nuggets of time to create as many memory making opportunities as possible. One of my personal favorite ways to spend time with my children is while I am baking and cooking.

Let's face it, we have to eat. Kids have to eat. Okay actually they want to eat constantly, but typically not the food we are preparing, sigh. Why not incorporate them in the food prepping process? Yes, I know you can do it faster and with far less mess; but remember as mothers, we're looking for as many opportunities as possible to spend QUALITY time with our children. I find that when I'm cooking or baking with my kids, that they have more of my undivided attention than with any other activity we could do together. Which for me, makes the positives far outweigh the negatives of my children being in the kitchen.

Cooking and baking is fun for children. It's one of the best sensory learning activities a child can do AND it's a life skill they can take with them forever. Even if you can't cook or bake, there are simple meal prepping activities you can involve your children with as you work to get the meal ready for everyone to eat. I have found the following 5 simple steps to help me remain focused on purposing to include my children in our family's meal prep even when it isn't the easiest process.
  1. Remember you're raising children who will become adults, and the art of preparing a meal is a huge asset for their future nutritional needs as well as budget.
  2. When children are involved in the cooking process, they are more likely to eat the food.
  3. As they get older they will be able to carry more of the workload of preparing family meals, therefore giving you an occasional break from kitchen duty.
  4. Responsibility is a good thing, it gives children confidence and the encouragement to believe in themselves in many different aspects of their lives
  5. Time in the kitchen with anyone, especially children, often leads to the best conversations which helps to further deepen a parent/child relationship.
While it may not be the easiest to cook or bake with a child 'underfoot', I can assure you the treasured memories you are creating deeply overshadow any inconveniences. Purpose NOT to look at the mess, they can always be cleaned up, but look at the sweet child who WANTS to be with you, gleaning from everything you have to share. There will come a time when they will no longer be in your home to create special memories and make those messes.

Even with all the demands of motherhood it is an awesome gift and one that shouldn't be taken for granted. While none of us will ever be the perfect mother, we can look for opportunities to spend quality time with our children. I challenge you to let your little ones bake and cook with you, relax, smile, and enjoy the journey. Make some messes but more importantly make some priceless memories.

With Love & Hope,
Jennifer

Thursday, June 20, 2019

Easy to Sew Homesteading Apron


As a homemaker and a homesteader I live in an apron. I can't stand ruining my clothes from day to day tasks, so I wear an apron to try to protect my clothes. I don't wear one to be cute, stylish, or to keep up with the latest fashion trends. It's pure and simple practicality.

Since aprons are a part of my daily wardrobe, I must admit I'm quite picky on apron design and fabric. I cannot stand aprons that must be tied! Ugh, there's nothing worse than having draping tails that get caught on everything, come untied, or worse fall in the toilet (um yeah been there a time or two ~ insert eye roll). I've tried smocks and they never fit right I'm constantly pulling at the straps. Trust me when you've got your hands covered in dough from kneading bread and your apron is falling off, it can get quite annoying! 

Well the other day, I was perusing Pinterest and I saw several tutorials for making this cute apron. It's kind of like a smock but not. The straps aren't nearly as drapy. Apparently, its a popular apron style the ladies are wearing ideally made from linen. Ha ~ that ain't happening in this house. Linen is expensive and I'd never have a solid colored apron, I actually use my aprons and they get DIRTY and stained. I like to make my aprons last as long as possible and the more I can hide inevitable stains the longer life I'm likely to get from my apron. While I do think the solid color linen aprons are quite lovely, they just wouldn't work for me. But I do think the pattern sews up just as nice not in a linen and it's an extremely easy apron to make. 😊


I decided to tweak the pattern I saw to meet my needs. I never take a pattern and use it exactly the way it's written or designed. That's one of the one things I love about sewing, you can create anything you want and customize it to fit your needs. I really love this pattern and think I will make a couple more just like it. Especially since it has been several years since I've made new aprons; my current ones have seen better days that's for sure! 

My apron measurements were
45 inches wide
35 inches long
The straps were 7 inches x 21 inches
The pockets I made 10 inches x 10inches

The instructions to make this apron are super simple. It's basically just 3 finished rectangles. If you want to get the best fit for the apron, measure the fabric so that when it drapes around you, it kind of overlaps in the back at the top. And then measure how long you want it to be adjusting for hemming. 

  • First, I took the long sides (35 inch side) and folded them in 1/2 inch twice pressing after each fold. And then I stitched them, staying as close to the edge as possible. 
  • Then I finished the top of the apron. I wanted to make it a little more decorative so I folded down 1/2 inch, pressed and then folded down 1.5 inches and stitched as close to the edge of the fold as I could. 
  • Then it was time for the pockets. I simply turned them in about 1/2 inch on all sides and then added the double fold bias tape to the top. If I had not added the bias tape I would have turned the top of the pocket twice and stitched the top part before sewing them on to the apron. 
  • After pressing the pockets and finishing the top of the pockets I laid my main apron part on the floor and situated my pockets where I wanted them to be (no scientific method just personal preference) and then I stitched them in place as close to the edge of the pocket as possible.
  • Now it was time for the straps. I pressed them in half long ways (right sides together) and stitched around all sides at 1/2 inch seam allowance leaving an opening to turn the straps right side out. After turning the straps right side out I pressed them (making sure to evenly adjust the opening) and then topped stitched around all the edges.
  • The hardest part of making this entire apron was honestly attaching the straps. First I attached the back straps placing them directly at the edge of the apron and stitching them in place (on the inside of the apron). 
  • To get a good fit on where to place the front straps I grabbed my pins and headed to the bathroom, lol. I wrapped the apron around me, crisscrossing the back straps, and then I pinned the front straps where I thought they fit best. Once I got them the way I wanted I headed back to my sewing machine and stitched them in place on the inside of the apron.
And now your apron is finished!
 I know clear as mud right? I'll add some pictures for making the apron soon. 😊
But, seriously with minimal sewing skills you really can make this apron, and it is absolutely perfect for homemaking and homesteading!


If you're in need of an everyday-around-the-homestead type of apron I highly recommend this pattern. If you're not so inclined to sew, I've seen quite a few on Easy. I'm all about making life on the homestead easier and more conducive to productivity. When you don't have to fool with tails and problematic straps trying to keep your apron adjusted properly; you can more effectively manage your daily tasks!

With Love & Hope,
Jennifer
Wednesday, June 19, 2019

How NOT to Get Overwhelmed with the Harvest


4 gallons of fresh picked bell pepper
This past Monday we found ourselves swimming in produce. Apparently after a couple weeks of some refreshing rain, our summer garden took a massive turn for the better! We had thought that everything was on the verge of dying and sadly we did lose our first big batch of green bean plants to the mini drought. Despite them prematurely dying we are grateful we were able to eat fresh from them several times, even if there was no canning like we had hoped. The corn also took a hit and instead of long, full ears of corn we only got a couple cobs from each stalk and they weren't the best we've ever had. But, that is the life of a homesteader and growing your own food; the outcome is all dependent on the Lord and what He sees fit to give.

It never fails no matter how well you plan your garden and stagger planting your crops; it's inevitable that at some point everything is going to hit in major quantities all at once. This is where you can quickly become overwhelmed!! NO worries, after years of experience I've got a list of steps to help you stay calm so you can quickly and efficiently conquer your awesome garden haul!!

This is what we were looking at Monday evening and I'm not going to lie, I was in a slight panic. But, thankfully I've been here before and after taking a quick assessment we began tackling what needed to be done to make the most of our blessed harvest.


On Monday we picked about 19 dozen EARS of corn. Most of which we left on the cob and put in the freezer. I'll be posting soon how we do this and how easy it really is to preserve corn on the cob! 


Next we had 6 gallons of cucumbers to come in adding to the 4 gallons we already had.


Then we picked 5 gallons of yellow summer squash.


A couple gallons of hot peppers.


Some zucchini & eggplant


A mess of green beans.


And a gallon of field peas or as I affectionately call them 'dirt peas'. 

We had a mighty fine blessing through our gardens to say the least, but now we had to figure out what we were going to do with it all. Here is how I typically handle a bumper garden haul like this:
  1. Determine the produce which you collected the most; that one takes priority, unless it's corn. Corn must be done within 24 hours or it ruins. 
  2. Decide what is going to be canned, frozen, dehydrated, or eaten fresh.
  3. Wash what needs washing.
  4. Put away what you plan to eat fresh in the fridge.
  5. Fill the dehydrator with what you want to dehydrate (In this haul we dehydrated the peppers).
  6. Chop and bag what you want to go in the freezer. (For this picking we skinned the corn, chopped the bell peppers, and shelled the peas all to go in the freezer ~ the peas we will can at a later time, but for now they can go in the freezer until we're ready to can them).
  7. Prep for any canning you plan to do, such as the squash, it can be cut the night before or just simply make sure you have all the supplies you needs for whatever you're canning the next day.
  8. If you got a super bumper crop coming in you can always try to sell some of it ~ we don't typically have good luck with selling, but you can always try.
  9. Go in on halves: this means someone helps you process your produce using whatever method you're using in return to take some of the harvest home with them.
  10. Give it away. After all it's better to give than to receive and I'd rather share our blessings with others than let it go to waste.
** And here's a BONUS TIP **
If you're going to be having a marathon canning day ALWAYS plan for simple meals throughout the day. I highly recommend putting something in the crockpot for dinner. Trust me when I say, you will not want to cook by the time folks are hungry for dinner!

Hopefully this simple guide will help y'all when it comes to dealing with the harvest. I like to remember it's all for just a short season. Maybe two months at the most when you feel like you eat, live, and breath the garden. And then all at once it's done and your larder is full and you can rest; enjoying the fruits of your labors throughout the fall, winter, and spring. And ironically, when the main summer garden rolls around again somehow you forget how much work it is to grow your own food. It's like the joy of enjoying the harvest in the off-season overshadows the reality of the time and effort you have to put into the main summer garden. It's a wonderful mercy from the Lord, that's for sure.  

Thankfully, our Monday harvest has all been taken care of and none of our produce went to waste. We're filling our larder one day at a time and I give all the glory to the Lord for giving us the harvest as well as the wisdom and strength to get it all done.

With Love & Hope,
Jennifer

Tuesday, June 18, 2019

Growing Potatoes From Start to Finish


Despite living in the south which is riddled with heat, humidity and lovely bugs, I'm determined to grow our own potatoes!! Another factor which complicates us growing potatoes is that we do not have a root cellar, basement, or crawl space; which makes storing potatoes long term nearly impossible. And as some folks do in the northern states, leaving the potatoes in the ground until we want to eat them is just not a method that would work for us: first because we need the space to plant other crops and second because the bugs would devour them before we could eat them all. We've tried many different methods for storing them over the years, but you'll have to keep reading to find out what we did with our crop of potatoes this year!


Growing potatoes really isn't that hard it just takes a long time for them to grow. We start with freshly tilled soil (with fertilizer tilled in if you're using) and a bag of seed potatoes. The kids and I took the seed potatoes and cut them into sections, cutting off parts so that each cut had an 'eye' (which is the part that leads to a potato plant). Then we dug a long trench, dropping potato chunks into the trench spacing them about a foot apart. After that you cover the trench back with dirt. As the potatoes grow you continue to cover them with dirt. Potatoes love light airy soil.


Once you start to notice the plants turning brown (dying) it's time to harvest your crop of potatoes. You want to be careful digging up your potatoes, because they're basically long vines under ground and it's easy to chop one in half or at the very least cut a potato you didn't want to cut. We lay our potatoes out on a tarp to dry out a little. Any green, mushy, or potatoes with evidence of bug bites we throw out.

This year we decided to further dry out the potatoes by setting them on tables lined with newspaper in our schoolroom. I'm not sure we'll do this method in the future as it did seem that we lost a good many to rot, but I'm not sure if we wouldn't have lost them anyways. After letting them dry out for 2 weeks; turning them after one week, we wrapped the remaining good potatoes individually in newspaper and stored them in an under-the-bed tote without the lid. We stacked the potatoes two layers high, and stored them under our bed. This is the first year we've done this so I'll keep you posted on how long they last.

Since potatoes cost a good bit when bought at our local grocery I don't purchase them all too often. So when our potato harvest comes in we typically eat them up fairly quickly. I wish there was a way we could grow a years worth and store them to last nearly as long, but that just isn't in the cards right now.

Oh I should add that any potatoes smaller than a baseball we canned to add to soups, stews, and to make mashed potatoes. Canning potatoes isn't hard it's just labor intensive! Thankfully, though our whole crew gets their hands into the mix to get the job done, and as they say "many hands make light work". I didn't get any pictures from when we canned our potato harvest, which is totally not like me, but I must have been seriously in the zone, lol!

While our potato preserving system may not be ideal, it works for us and we get to enjoy farm fresh potatoes grown by our hands! Trust me it's well worth all the extra work!!

With Love & Hope,
Jennifer


Monday, June 17, 2019

Father's Day for a Foodie

Shopping for my husband can be so very hard! He's a simple guy who works, homesteads, and does the family thing. He doesn't really have personal hobbies. He has a bottle of cologne he will use for y-e-a-r-s, he's not a tech guy, and he only likes to have a few shirts and bottoms (I typically reserve Christmas to restock his closet). Seriously y'all every time holidays or birthdays roll around I'm in a scramble to figure out the perfect gift to get my no-fuss simple man. The only thing that happens to be my saving grace is he's a foodie. He loves good food, trying new restaurants, and has a major weakness for snack foods, lol.

This year instead of a 'Father's Day celebration it was more like a Father's Day Weekend celebration. Friday, Saturday, and Sunday were spent celebrating Dad. My kids are extremely blessed with a dedicated and devoted father and a little extended celebrating was just what he deserved!

Large Family Dad
Father's Day 2019
Because Sundays are overwhelmingly chaotic with getting our crew ready for church, driving 45 minutes to church, wresting little ones for an hour and a half during the church service  (we do not have a nursery at our church ~ nor would we use one if we did, we prefer to train up our children in the church service with us), serving up our large crew the fellowship meal, and then driving the 45 minutes back home; I decided to prepare my husband his favorite meal on Friday.

He did not request this and it was a surprise from my kiddos and me. His favorite meal takes about 4 hours to make (added time because I have to basically triple everything for our large family). So Friday afternoon was spent making four homemade deep dish pizzas, a giant pan of cheesy bread, and a blackberry pie. Everything was made from scratch and much of the ingredients were picked fresh from our little homestead. He was pleasantly surprised when he came in from work to say the least!

deep dish pizza
Father's Day Pizza Extravaganza
The pizza choices for our Father's Day meal was cheese, pepperoni, spicy buffalo chicken, and supreme.

pizza from scratch
Homemade Deep Dish Supreme Pizza
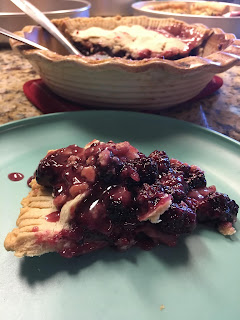
blackberry pie
Homemade Blackberry Pie
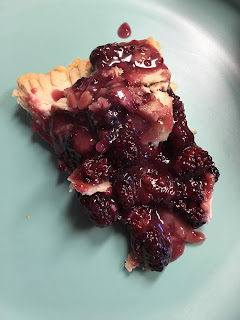
The blackberry pie was made with berries picked fresh from our bushes. It may not be the prettiest pie but it sure was yummy!

blackberry pie

When your family can't wait for the pie to cool a little and set this is what it looks like, lol! At least the pizzas were pretty. 

blackberry pie

Saturday the children who had extra money took their daddy out to eat at a fine dining restaurant to eat a steak dinner. Each child paid for their own meal and contributed to their daddy's meal. I stayed behind with the little bitty ones and the children who made/bought a gift for their Daddy. The eating-out crew ended up getting a late start since my oldest had to work so they arrived at the restaurant later than they had planned and it was crowded!! They ended up getting bumped to a smaller table and due to the over-crowding an entire soda was spilled in my husband's lap (poor guy). Because it was so crowded he ended up having to clean up the mess ~ at least his meal was good, lol!!

Sunday was church of course and as is custom my husband made his famous omelettes for everyone. I offered to cook but he said he wanted to eat his omelettes on his special day. Then we we got home from church he grilled a ton of meat for himself, his dad, and the rest of us. I hate that he chose to do all the cooking on Father's Day, but I guess he was in his element and he thoroughly enjoyed his food.

gift baskets

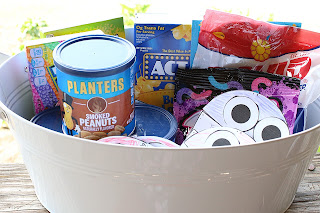
The kids and I put together a goody basket full of their Daddy's favorite snack foods and a gift card for Longhorn Steakhouse.


We also made him these cute little popsicles with sweet notes of why each of the children think their daddy is the "coolest". I found this craft for free over at Teachers Pay Teachers


Ok I know y'all may find this totally weird but I wanted to share about the tasty peanuts!! These happen to be one of my hubby's favorite snack foods. I'm sure I can order them online, but the only place can find them locally is at the Dollar Tree. If you can find a container you should totally give them a try!!

I think my husband had a wonderful Father's Day weekend, at least he keeps raving about it and said he felt extra-specially loved. (Which was my hopeful intentions!) He also said he was going to have to step up his Mother's Day celebration 'game', haha now that was not my intentions at all. Even though I had a tough time coming up with a gift to show my husband how much he means to me being the father of our children, I believe this year me and the kiddos actually got it right 😍.

So how did y'all celebrate the special father in your life?

With Love & Hope,
Jennifer