Showing posts with label homemade Christmas. Show all posts

Saturday, January 11, 2020

Christmas Baking 2019


When I was planning for our Christmas festivities back in the summer, I was a tad bit cautious in over planning in the baking department. I decided to plan for only a few baked goodies and candy making, then reevaluate as the season progressed with my pregnancy and how I felt. I ended up feeling extremely well and we ended up adding a whole lot more baking and candy making to our Christmas schedule.

The pictures on this post are not posted in order, but I thought it would make more sense just to post the pictures in similar groups. The above picture is some peanut butter kiss cookies we baked. Sadly these were not a huge hit with my people. The cookies were excellent, but no one liked the candy kisses. Most folks picked off the candy and just ate the cookie.


We kicked off our Christmas baking with cut-out sugar cookies that we iced and loaded down with sprinkles. Of course these are a family favorite and a must for my people at every holiday.


Everyone pitched in extra this holiday baking season since I was about to have a baby any day throughout all our baking madness, lol.


Next up we had traditional cookies. We first made three different kinds and then later in the month we baked three other types of cookies. 


The first three batches of cookies were mostly packaged into goodie bags and given to neighbors. 


Since we gave away most of the first three batches of cookies, we also made these Christmas M&M cookies, as well as the peanut butter kiss cookies pictured above, and the Christmas tree spritz cookies pictured below.


Spritz cookies aren't exactly a favorite for my family, but there's just something about them that says Christmas to me, so I had to make them. 


Red velvet white chocolate was among the first batch of cookies we made.


As well as chewy oatmeal.


 Last up in the cookie baking was peanut butter white chocolate cookies.


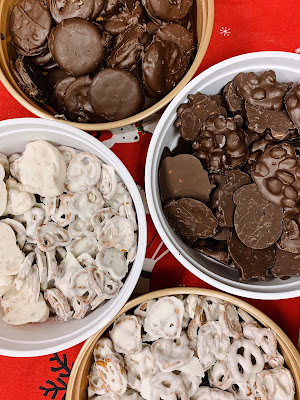
We also made an assortment of candy.


First we made peanut butter white chocolate Krispies.


Then we made chocolate covered peanut butter ritz crackers.


As you can see by Samuel's face the children had loads of fun making candy this year. This is one of our favorites that we call chocolate peanut clusters.


And no Christmas candy making session is complete without white chocolate covered pretzels. These are always the first to be gobbled up in our family. 


We tried a few new Christmas treats this year and one of them was Christmas crack or I've heard it called saltine cracker toffee. This was an interesting candy which my family did not like. We made three different versions, one with crushed pecans, one with chocolate M&M's, and one with sprinkles. I really, really liked the one with sprinkles, even if my family didn't.


These Rolo pretzel bites were also a new treat we made this year, which unfortunately, was not a favorite either. My children ended up picking the candies out of the pretzels because the pretzels became stale, even though they were stored in an airtight container. {{sigh}}


I wasn't going to make these chocolate covered peanut butter cheese-it bites, but my kiddos said they were a must. They blessed me by making every bit of them without any of my help.


Also a new addition to our Christmas candy making were these white chocolate haystacks. 


Due to the fact that our family is so large and we decorate so many gingerbread houses; we also make the gingerbread cookies to make the actual houses.


Since it takes so long for the houses to set up; the big kids, mom, and dad assemble the gingerbread houses the night before we plan to decorate them. 


Last but not least we also made a mega batch of Doodads. Even though Doodads aren't really under the realms of baking, it is something we make especially to enjoy during the Christmas holidays. The picture above was only half of what we actually made. 

Is baking a necessity to celebrate Christmas? Absolutely, not! But it is a treasured Christmas tradition for our family. I am so glad that even though I was extremely pregnant this Christmas, we were still able to make our favorite Christmas treats and even try a few new ones.

With Love & Hope,
Jennifer 

Thursday, January 9, 2020

DIY Wood Slice Photo Ornaments


Every year for Christmas we give our children an ornament. Some years the ornaments are store-bought and other years they are homemade. This year I made each of the children a homemade ornament using wood slices and a picture of each of them.

The supplies to make the ornaments include: these wood slice ornaments, a small photo of each of my children, a circle cut-out of Christmas paper to cover the wood ornaments, narrow red ribbon, and Modge Podge. 

To make the ornaments:

  1. Cut out the photos to your desired size.
  2. Cut out Christmas paper to desired size to cover most or all of the wooden ornament.
  3. Cover the wood slice with Modge Podge using a sponge paint brush and place the Christmas paper over the wood slice, then do another coat of Modge Podge over the paper.
  4. Place the photo on top of the Christmas Paper and paint another layer of Modge Podge.
  5. Let dry.
  6. Tie red ribbon around top of wood slice (I hot glued mine in place to prevent it from coming off the ornament).
  7. Tie twine through the top of the wood slice ornament and trim excess to preferred length.
  8. I also took a fine tip white paint marker and wrote 2019 underneath each photo.


Since Abigail was born so close to Christmas, I didn't have a chance to get a picture of her to make her a photo ornament. I decided to try to get a handprint of her sweet little hand on the wooden ornament, but as you can see it didn't turn out quite like it should have. I almost threw it away, but decided against it. It will be a precious memory and you can sort of make out her tiny hand.

These ornaments were super easy to make and took very few supplies. If you've read any of my previous posts, I'm sure you have gotten the vibe, that homemade items are extra special to me. I love to make and give them; even if they do take a little bit of extra time than just going to the store and buying them. I must admit as the years progress it's getting harder and harder to come up with new and creative ideas for making the kiddos homemade Christmas Ornaments. Which is why I typically start at the beginning of the year, planning for whether it will be a homemade or store-bought Christmas ornament year.

With Love & Hope,
Jennifer

Wednesday, January 8, 2020

Homemade Christmas 2019


Today I'd like to share a couple homemade Christmas projects/gifts we made this year. 

I love Christmas and all it's festivities, but some times folks can take it too far, especially in the gift giving department. Yes, we exchange store-bought gifts within our family, but as great as those are, I think the homemade gifts are just as special, if not more. 

To be perfectly honest, I'd like to get back to the simple days when it was maybe one store-bought gift, a couple homemade gifts, plus a stocking. I suppose those days are long gone, and that's ok, because I believe we can still keep Christmas sweet and simple even in our current modern culture.


Some years we give more homemade gifts than others, but we always create some form of homemade gifts to give. Every year my husband requests a picture gift that he can put at his desk at work. And each year I try to make something creative and different. This year I thought I'd try making him a calendar.


First, I had the children paint watercolors onto card stock to create a 'tie-dyed' look.


Then I found a free 2020 calendar template online.


Next I printed the calendar onto the card stock that the children had painted.


Before I assembled the calendar I printed off pictures of each one of our children, one of my husband and me, a family picture, and one of all the children.


The next step was to find twelve bible verses to print on the reverse side of the calendar. I tried to choose verses that were relative to that month or season.


I glued the pictures onto the backside of the calendar papers next to the Bible verses.


I tried matching the children's pictures close to their birthday months.


Before Abigail was born, we only had two children with the same birthday month. So it was fairly easy to match the children's pictures to their birthday month.


Due to time constraints I wasn't able to get a picture of Abigail printed for this calendar. 


I decided to put mine and my husband's picture in February ~ for Valentine's Day. And I put our family picture for the month of October since that's when our anniversary is, and when we celebrate the beginning of our family.


I decided to laminate the pages once I had all the pages finished.


Finally, I hole punched the pages and connected them with three 1-inch rings.


Our last project we did for Christmas was actually completed on Christmas Eve. {{Yikes}} Nothing like a last minute project.


My parents were kind enough to send some money along with the children's gifts to buy "stocking stuffer" items. When I bought the children's Christmas goodies from grandma and grandpa, I didn't think to buy something to put the stuff into, hence the last minute goodie bags we made.  


My twelve year old was kind enough to help me cut out the pieces for these reindeer goodie bags. I had a variety of circle punches which I used to cut out most of the pieces. For the antlers, I just free handed a template onto card stock and we traced it 20 times, lol. 


Here's all the reindeer goodie bags filled and placed in front of the Christmas tree on Christmas Eve. I thought they were so cute and looked like a heard of reindeer.

Now, homemade gifts can end up costing more than store-bought gifts if you aren't careful; but, thankfully, both of these projects were pretty cheap to make. The bags were completely made with leftover craft supplies, and the only 'extra' cost of the calendar was the price of having the pictures printed. Everything else we used to make the calendar, I already had readily available in our home. While it does take space to store crafting supplies, sometimes it can pay off, especially when you can inexpensively make heart-felt homemade gift for family and friends.

With Love & Hope,
Jennifer

Monday, November 25, 2019

A Christmas Vinyl Project


For as long as I can remember we've been a 'water only' family, especially when we go somewhere. Even if it's just to town, we all bring our own water bottle with us. Which means everyone has their own water bottles. When I got my Silhouette Cameo, and was able to cut vinyl, I started monogramming our children's water bottles just to help streamline the whole whose is whose.


Our children's current water bottles are in dire need of replacing. They are stainless steel with stainless steel screw-on lids. For some reason after only about two years of use the lids have started seizing onto the water bottles, making them a pain to use, especially for the little ones. So this year I came across all these water bottles on deep clearance at Target ~ my favorite kind of finds when I'm shopping for our large crew.


Unfortunately, Target did not have enough of the stainless steel water bottles for all my littles so Lydia is getting this one and I had to order one off of Amazon for my oldest (which has not been monogrammed yet).

All of the water bottles will go into the children's stockings for Christmas. I did buy Abigail (our new little one who will be here by Christmas) some baby bottles for her stocking, but I decided not to monogram them ~ just in case we have any more daughters who may need to use those bottles. 😬

I'm afraid this was my last vinyl project with my current Silhouette Cameo and computer combo. I've been in dire need of replacing my whole system for the past year, but I just haven't wanted to spend the extra money on it, especially since it's not a necessity. I just really enjoy making the cute vinyl crafts, and now if I'm going to continue with these projects I will have to upgrade. Thankfully, I was able to get this project done and I have a couple of months to decide if I really want to continue with the vinyl crafting.

With our large crew I really like having the monogrammed items which helps to keep 'whose is it squabbles' to a minimum. I've tried color matching to each child for things like cups and towels, but it has yet to work for our family ~ insert eye roll!

I'm hoping since the lids to these stainless steel water bottles are plastic that they will hold up better and longer than the ones we currently have. But, I am nervous that the plastic is going to crack and break with my rough and tough crew, especially with how much we use them. Time will only tell, I suppose.

Over the years I've always tried to make the children at least one homemade gift for Christmas. One year almost our entire Christmas was homemade (that was a special year, but a lot of work!). This year the extent of our homemade gifts are only these water bottles monogrammed and I hardly consider them homemade ~ sigh. But, my children do enjoy receiving gifts with their names on them. Maybe next year, I can get back to my homemade gifts; there really is something extra special about giving and receiving homemade gifts ~ at least there is to me.

With Love & Hope,
Jennifer